Best kayak anchor trolley system
Every kayak angler in West Virginia knows the struggle: you've finally found that perfect eddy or seam on the New River, or you're trying to work a specific structure on Summersville Lake, only for the wind or current to relentlessly push you off target. It's incredibly frustrating when you're spending more time repositioning than actually fishing. This guide is all about equipping you with the knowledge to choose, install, and use the best kayak anchor trolley system, so you can hold your ground and fish effectively in our beautiful, challenging waters.
What is a Kayak Anchor Trolley System?
At its heart, a kayak anchor trolley system is a deceptively simple yet incredibly ingenious piece of gear designed to give you precise control over your anchor point from anywhere on your kayak. Instead of your anchor rope being fixed to one spot, like the bow or stern, a trolley allows you to move that attachment point along the length of your boat. This means you can adjust your position relative to the anchor without having to pull it up and re-drop it every time the wind shifts or the current changes direction slightly.
The Basic Components
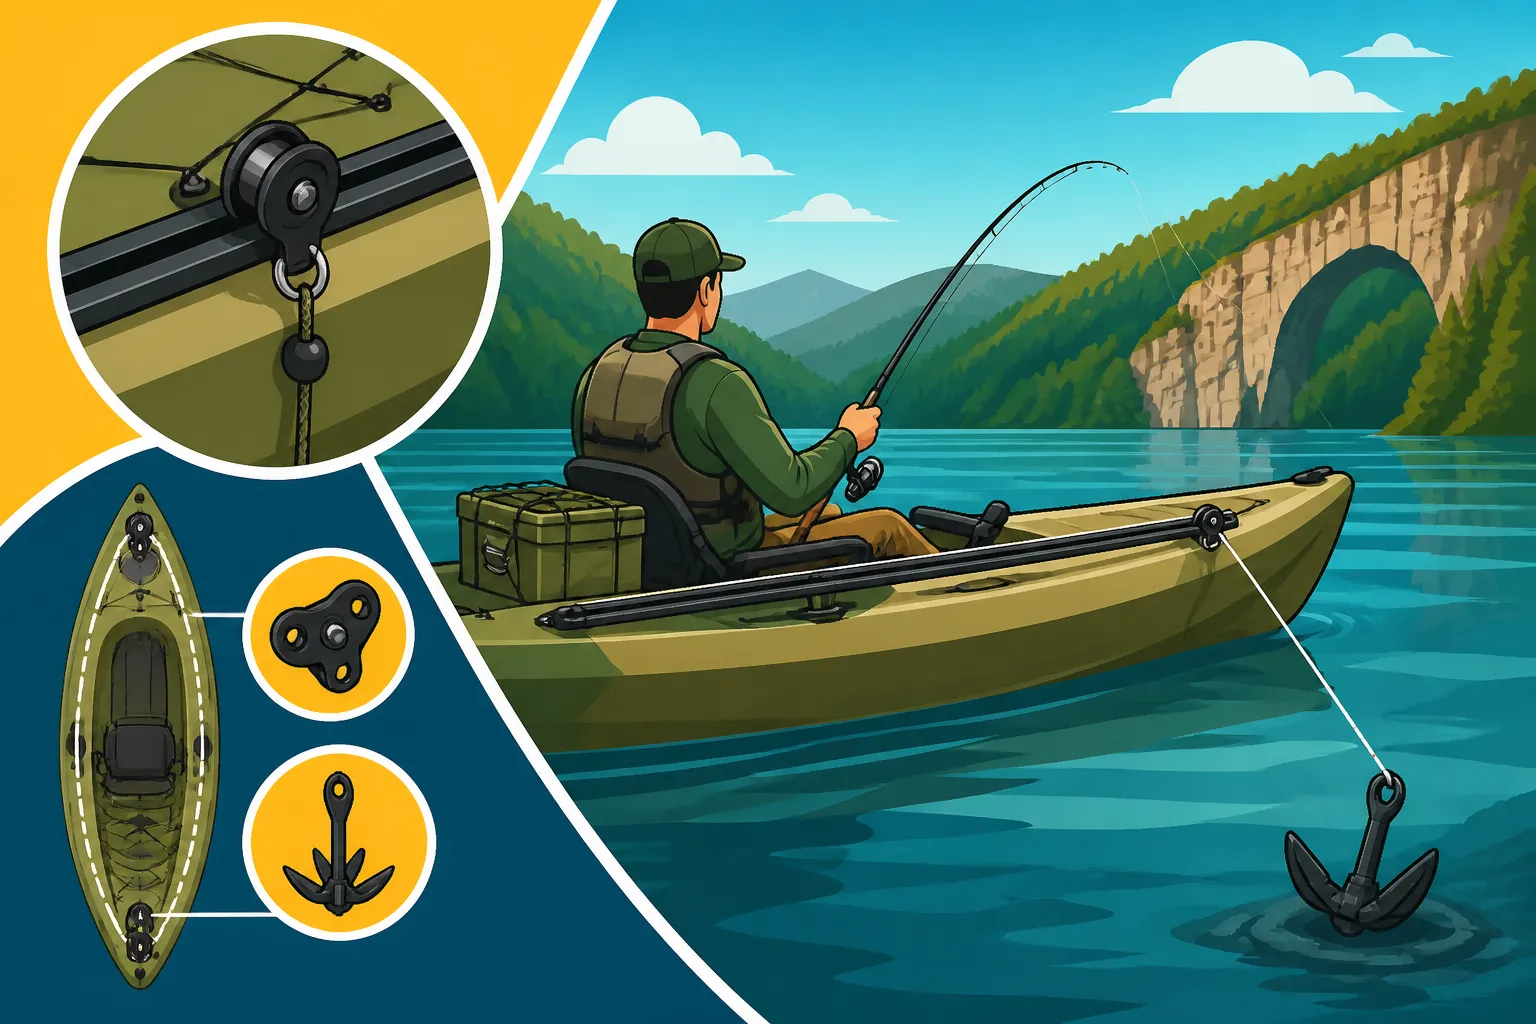
Think of an anchor trolley as a miniature pulley system running from one end of your kayak to the other, usually along the gunwale. The core components are fairly universal, whether you're building one yourself or buying a pre-made kit from somewhere like Bass Pro Shops or Amazon.
You'll typically find two small pulleys – one mounted near the bow and one near the stern. A continuous loop of rope or cord runs through these pulleys, creating the "trolley line." Attached to this trolley line is a ring or a carabiner, which is where you clip your actual anchor rope. There's also usually a cleat or a similar device to secure the trolley line itself once you've set your anchor point, and a few pads or fairleads to guide the line smoothly. Some systems also include a quick-release mechanism, which is a fantastic safety feature we'll delve into later. Knowing these basic parts helps you understand how it all comes together to make your life on the water so much easier.
How It Works in Practice
The magic of the anchor trolley really shines when you're out on the water. Here's the typical workflow: First, you drop your anchor. Once it's set and holding, you simply pull on the trolley line to slide the anchor attachment point forward or backward along your kayak. If you want your kayak to face directly into the current or wind, you'd pull the trolley ring towards the bow. If you prefer to fish broadside to the current, perhaps to cover a wider retrieve or present your bait more naturally across a seam, you'd slide the ring to the side, adjusting your angle.
The real beauty is how subtle and precise these adjustments can be. A slight tug on the trolley line lets you pivot your kayak just enough to hit that specific pocket of calm water or cast to a piece of submerged timber with accuracy. It transforms your kayak from a boat that simply drifts or sits in one spot into a much more versatile and controllable fishing platform. It's a game-changer for navigating those tricky stretches of the Elk River Trout Fishing or holding steady in a productive spot on the Kanawha River Fishing Spots.
Why Every West Virginia Kayak Angler Needs One
If you've spent any time fishing from a kayak in West Virginia, you know our rivers and lakes can throw a lot at you. From swift currents on the New River to gusty winds whipping across Summersville Lake, staying put is often half the battle. This is precisely where an anchor trolley system goes from a "nice-to-have" to an "absolute essential." It’s more than just convenience; it’s about safety, efficiency, and ultimately, catching more fish.
Precision Positioning for Better Fishing
Imagine you're trying to drift a jig down a specific current seam where you know smallmouth bass are holding on the Greenbrier River. Without an anchor trolley, you'd drop your anchor, and your kayak would settle wherever the anchor rope fixed it, likely leaving you at a less-than-ideal angle. You might be casting upstream into the current, or perpendicular to the seam, making it hard to maintain a natural presentation. With a trolley, you can drop your anchor, then slide your attachment point to the bow, facing you directly into the current, allowing for perfect downstream drifts. Or, perhaps you want to cast across the current to work a bank. You can position your kayak broadside, letting you cover more water with each cast. This level of control translates directly into more effective lure presentation and, hopefully, more fish in the net.
Consider the times you're working a bank for largemouth bass on a calm lake like Plum Orchard. A gentle breeze often wants to turn your kayak away from the shore, forcing awkward casts or constant paddle corrections. An anchor trolley allows you to drop a shallow water anchor (like a stake-out pole) off your stern, then slide the trolley to the bow to face the bank head-on. This subtle adjustment makes a massive difference in your ability to thoroughly fish a section of shoreline without fighting your boat the whole time. It's about taking the frustration out of holding position and putting the focus back on the fishing.
Enhanced Safety and Control
Safety on the water is paramount, especially when you're in a small craft like a kayak on rivers like the New or even the wider sections of the Ohio River. One of the biggest safety advantages of an anchor trolley is the ability to quickly release your anchor and change your boat's orientation. If your anchor gets snagged on something heavy downstream in strong current, it can pull your bow under, creating a very dangerous situation. A well-designed anchor trolley system usually incorporates a quick-release setup. This means you can unclip your anchor rope from the trolley ring and let it go free with a flick, instantly freeing your kayak from the hazard. Some systems even have a dedicated quick-release cleat that lets the entire trolley line run free.
Furthermore, being able to adjust your boat's angle allows you to manage waves and wakes from passing boats more effectively. You can quickly pivot your bow into incoming waves, preventing them from crashing over the side. This control, particularly in unpredictable West Virginia waters, adds a significant layer of security to your kayak fishing adventures. It's a piece of gear that not only helps you catch fish but can also prevent a difficult situation from becoming truly dangerous. Check out Life Jacket Requirements for West Virginia Boaters for more essential safety info.
Versatility for Different Fishing Scenarios
West Virginia offers such a diverse range of fishing environments, from tranquil ponds to roaring rivers, and an anchor trolley system adapts beautifully to them all. On smaller, slow-moving streams or ponds, you might use a lightweight grapple anchor or a stake-out pole with your trolley. The ability to shift your boat slightly means you can fish around a fallen tree or a patch of lily pads from multiple angles without re-anchoring.
For deeper lakes like Summersville or Stonewall Jackson, where you might be targeting walleye or crappie, a traditional anchor with more rope length is suitable. The trolley still allows you to work a drop-off or submerged hump precisely, adjusting your casting angle as needed. When the wind picks up, you can drop your anchor, face your bow into the wind, and present your baits into the target zone without being constantly pushed around. This adaptability makes it an invaluable tool for any angler navigating the varied landscapes of West Virginia fishing.
Choosing the Right Anchor Trolley System
So, you're convinced! Now comes the fun part: choosing an anchor trolley. This isn't a one-size-fits-all decision, as kayaks, fishing styles, and budgets vary widely. You'll find options ranging from DIY kits to sophisticated, pre-assembled systems. The key is to select one that matches your kayak and your typical fishing environment.
DIY vs. Pre-made Kits
This is often the first decision point for many anglers.
- DIY (Do-It-Yourself): Building your own anchor trolley offers the ultimate in customization and can often be more budget-friendly. You source the individual components – pulleys, rope, rings, cleats – from a hardware store or online retailers like Amazon. This route allows you to pick specific strengths and materials, and tailor the length and placement exactly to your kayak. The downside is that it requires a bit more effort, some basic tool knowledge, and a clear understanding of what you're trying to achieve. However, for those who enjoy tinkering, it's a rewarding project.
- Pre-made Kits: These kits come with everything you need, often pre-assembled, and are designed for easy installation. Brands like Scotty, YakAttack, and Wilderness Systems offer excellent kits that typically include high-quality marine-grade components. The advantage here is convenience and a guaranteed fit for most popular fishing kayaks. The instructions are usually clear, and you can get one from most outdoor retailers or online from a place like Bass Pro Shops. The trade-off is often a higher price point and less customization compared to a DIY approach. Both are excellent choices, it just depends on your preference!
Here's a quick comparison:
| Feature | DIY Anchor Trolley System | Pre-made Anchor Trolley Kit |
|---|---|---|
| Cost | Generally lower, can vary based on component quality | Generally higher, but includes all parts |
| Customization | High, choose specific components and layout | Limited, designed for general kayak types |
| Installation | Requires more planning and sourcing, assembly | Easier, often pre-assembled with clear instructions |
| Component Quality | Varies by individual selection | Usually marine-grade and matched components |
| Time Investment | More time in planning, sourcing, and assembly | Less time, quicker to install |
| Skill Level | Basic DIY/tool skills | Minimal, often just drilling and securing |
Key Features to Look For
When you're sifting through options, whether in a store or online, keep these features in mind to ensure you get a robust and effective system.
- Pulleys: Look for durable, marine-grade pulleys that can withstand saltwater (even if you're primarily freshwater fishing in West Virginia, quality counts!). Stainless steel or high-strength plastic are good options. Smooth-operating pulleys reduce friction and make adjusting your anchor point much easier. Small, flimsy pulleys will wear out quickly or bind under tension, defeating the purpose of the system.
- Rope/Cord: The trolley line needs to be strong, UV-resistant, and have a good feel in your hand. Braided nylon or similar marine-grade ropes are common choices. Ensure it's not too thin, or it'll be difficult to grip when wet or cold. Some systems use reflective cord, which is a nice touch for visibility in low light.
- Ring/Carabiner: This is where your anchor rope attaches. A sturdy, non-corroding ring or carabiner is crucial. Make sure it’s large enough to easily clip your anchor line to, even with cold hands or while wearing gloves. Many prefer a simple ring for less bulk, but a high-quality stainless carabiner can offer quicker attachment.
- Cleat/Line Lock: You need a reliable way to secure the trolley line once you've set your anchor point. A cam cleat allows for quick adjustment and locking, while a standard horn cleat requires a little more effort to tie off. Some systems use a simple "Zig Zag" cleat which is effective for quick, minor adjustments. The most important thing is that it holds securely without slipping, even under load.
- Safety Quick Release: This is a non-negotiable feature for river fishing. In case your anchor snags, or you encounter unexpected rapids, you need to be able to release your anchor instantly. This can be integrated into the cleat system or a separate mechanism that allows the anchor rope to run free. Don't skimp on this feature; it's a lifesaver. When fishing the Best Kayak for the New River, for example, current can be deceptively strong, and a quick release is essential.
Mounting Location Considerations
The most common and effective mounting location for an anchor trolley is along one side of your kayak, running from bow to stern. This allows for full-length adjustment. Most anglers prefer to mount it on the side opposite their dominant casting arm, keeping that side clear for casting and re-entry. However, some might prefer it on their casting side for easier access to adjustments.
Consider any existing rigging on your kayak. You want to ensure the trolley line doesn't interfere with paddle strokes, rod holders, or other accessories. For wider kayaks, you might even consider a "dual" trolley system, with a line on each side, though this is less common and adds complexity. Always do a "dry run" installation (temporarily taping components) before drilling any permanent holes to ensure optimal placement for your comfort and fishing style. Think about how you’ll be sitting, casting, and reaching for the line when you’re out on the Best Fishing Lakes in West Virginia.
Installation and Maintenance Tips
Installing an anchor trolley system, whether it's a DIY project or a pre-made kit from a reputable supplier like Bass Pro Shops, isn't overly complicated, but doing it right is crucial for its performance and your safety. Once installed, a little routine care will keep it running smoothly for many seasons of West Virginia fishing adventures.
Step-by-Step Installation Guide
While specific instructions will vary slightly based on your kayak and the chosen kit (always follow the manufacturer's guide!), here's a general overview to give you a clear picture of the process:
- Gather Your Tools: You'll typically need a drill, drill bits appropriate for your hardware (usually 1/8" or 3/16"), a Phillips head screwdriver, a ruler or tape measure, a marker, and a marine-grade sealant (like marine silicone or Goo Gone Marine). Safety glasses are a must!
- Plan Your Layout: Lay out all the components on your kayak. Decide which side you want the trolley on (most prefer the non-casting side). Mark the spots for your pulleys (one near the bow, one near the stern), the cleat or line lock, and any other line guides. Ensure the line will run clear of obstructions and be easily accessible from your seating position. Remember to account for the curve of your kayak's hull.
- Drill Pilot Holes: Carefully drill small pilot holes at your marked locations. Start with a smaller bit and gradually increase if needed. Take your time to prevent cracking the plastic.
- Mount Pulleys and Guides: Apply a dab of marine sealant to each screw hole before fastening the pulleys and line guides. This helps prevent water intrusion into your kayak's hull. Tighten securely, but don't overtighten, which can strip the plastic.
- Thread the Rope: Loop your trolley rope through the pulleys, creating a continuous circle. You'll then attach your quick-release ring or carabiner to this loop. Make sure the rope isn't twisted.
- Install the Cleat/Line Lock: Mount your cleat or line lock in a convenient spot, typically mid-kayak, applying sealant as before. This is where you'll secure the trolley rope to hold your anchor point.
- Test and Adjust: Once everything is installed, test the system thoroughly. Pull on the trolley line to ensure the ring slides smoothly from bow to stern. Practice securing the line with the cleat and, most importantly, practice the quick-release mechanism. Make any minor adjustments to cleat placement or line tension as needed. A properly installed system should operate with minimal effort. You might even want to check out some video tutorials online to see different setups in action before you begin.
Essential Maintenance for Longevity
An anchor trolley system is constantly exposed to the elements – sun, water, dirt, and friction. A little routine maintenance will ensure it performs flawlessly year after year, preventing frustrating breakdowns when you're miles from the launch on the Ohio River Fishing Guide for West Virginia Anglers.
- Rinse After Use: After every outing, especially if you've been in murky water or brackish conditions, give the entire system a good rinse with fresh water. This removes dirt, grit, and any salt that can cause wear and corrosion.
- Check for Wear: Regularly inspect the rope, pulleys, and all hardware. Look for frayed rope, cracks in plastic pulleys, or signs of rust on metal components. The trolley line takes a lot of abuse, so replace it if it shows significant fraying. Pulleys should spin freely; if they're stiff, they might need cleaning or replacement. Pay close attention to the quick-release mechanism to ensure it's still functioning perfectly.
- Lubricate Pulleys (Optional): If your pulleys start to feel a bit stiff, a light spray of a marine-grade lubricant (like silicone spray, not oil-based lubricants which can attract dirt) can help keep them running smoothly. Avoid over-lubricating, which can attract grit.
- Secure During Transport: When transporting your kayak, make sure the anchor trolley line is secured so it doesn't flop around or get tangled. A simple elastic cord or Velcro strap can keep it neatly tucked away, preventing accidental damage.
- Winter Storage: If storing your kayak for the winter, give the system a thorough cleaning and inspection. If any components are heavily worn, consider replacing them before your next spring fishing trip. Proper care will ensure your anchor trolley is ready for action when the Best Time of Year to Fish in West Virginia rolls around again.
Remember, a well-maintained anchor trolley is a reliable anchor trolley, and reliability is key to a stress-free day on the water, allowing you to focus on catching those West Virginia beauties!
Disclaimer
This article is for general informational purposes only and does not constitute professional advice. Laws, prices and regulations vary by location and change over time. Consult a qualified professional for guidance on your specific situation.